in Code

Part 4: Testing and interacting with your fine-tuned LLM

This post is the final part of: A simple guide to local LLM fine-tuning on a Mac with MLX.


This part of the guide assumes you have completed the fine-tuning process and have an adapters.npz file ready to use. If that’s not the case check our Part 3: Fine-tuning your LLM using the MLX framework.

Step 1: Determine prompts to compare results of fine tuning

In order to test and see the results of your fine-tuned model, you’ll want to compare prompting the fine-tuned model to the base model.

I’m not going to go into detail on the best way to do this, you’ll likely to want to create a number of prompts for the outputs you’re trying to improve with fine-tuning.

Depending on the kind of fine-tuning you’re doing you may have quantitative or qualitative ways to evaluate the results.

Step 2: Test your prompts on the base and fine-tuned models

The MLX library has some built in functionality to handle model inference.

To prompt the base model head to the llms folder inside the mlx-examples repo. You can use the mlx_lm.generate command to prompt the base model:

python -m mlx_lm.generate \
  --model mistralai/Mistral-7B-Instruct-v0.2 \
  --max-tokens 1000 \
  --prompt "How do I build an online store using WordPress that will allow me to sell car parts? I want to be able to ship them and charge people using credit cards."
The command to prompt the base model.

In order to prompt your fine tuned model you’ll need to provide the location of your adapters file. You can do this from the lora folder in the mlx-examples repo. Use the lora.py script and the following params:

python lora.py \
  --model mistralai/Mistral-7B-Instruct-v0.2 \
  --adapter-file ./fine-tuning/adapters/adapters.npz \
  --num-tokens 1000 \
  --prompt "How do I build an online store using WordPress that will allow me to sell car parts? I want to be able to ship them and charge people using credit cards."
The command to prompt your fine-tuned model.

In the above two commands, be sure to replace the --model and --adapter-file arguments with the correct Hugging Face path and adapters file location for your setup.

The num-tokens argument is optional and defaults to 1000. Depending on the length of answers you expect you may need to adjust this.

Step 3: Analyze your results

My WordPress fine tuning of Mistral 7B was simply a fun exercise so I wasn’t prepared to do a very thorough analysis of the results.

I tried 10 to 20 different prompts with more complex WordPress questions and evaluated how thorough and complete the answers were compared to the base model.

As I mentioned above, you may have specific ideas on how you want to evaluate depending on the kind of results you’re looking for. That’s up to you.

For completeness, here’s the prompt output for the base model, and the fine-tuned model for the prompt used in the examples above. You can see the depth and quality of the answer has significantly improved, but it has also drastically increased response length. More work is needed!

Step 4: Fuse your adapters into a new model

If you’re happy with your new fine-tuned model you can proceed to fuse your LoRA adapters file back in to the base model.

Doing this makes running the model easier with traditional inference tools (although GGUF format is not quite ready yet). You can also upload your fine-tuned model back to the Hugging Face MLX community if you wish.

To fuse your model use the following in the lora folder:

python fuse.py \
  --model mistralai/Mistral-7B-Instruct-v0.2 \
  --adapter-file ./fine-tuning/adapters/adapters.npz \
  --save-path ./Models/My-Mistral-7B-fine-tuned
  --upload-name My-Mistral-7B-fine-tuned
  --de-quantize
  
The command to fuse your adapters with the base model.

The adapter-file and save-path arguments are optional if your adapters file is in the same directory, and you want to save the new model to the same directory.

If you don’t want to upload your fine-tuned model to Hugging Face, you can omit the upload-name argument and it will save only to your save-path location (or the same folder if you leave this argument out).

In the next step, we’ll convert your fine-tuned model to GGUF format. To do this we have to de-quantize with the --de-quantize argument. If you don’t want to convert to GGUF you can omit this argument.

Lastly, if you have started with a local base MLX converted model, provide the folder location as the model argument. In this case you’ll need to provide the original Hugging Face model path in a hf-path argument to upload the fine-tuned version to Hugging Face.

What about chatting with my model?

Prompting using the tooling in the MLX Examples library is one thing, but the most obvious question is “how do I have an ongoing conversation with my fine-tuned model”?

The answer is converting it to GGUF format. While the mlx-examples repo does not have a built in way to do this, you can convert your fine-tuned model that you fused in the previous step.

To do this you will need to follow instructions for converting to GGUF using llama.cpp. Once you have a GGUF version of your model, you’ll be able to run inference in Ollama, LM Studio and other apps.

Thanks for reading

I hope you found this guide helpful! If you have any feedback, questions, or suggestions for any part of this guide please drop them on the Twitter/X thread, or on the Mastodon thread.


Part 3: Fine-tuning your LLM using the MLX framework

Updates:

in Code

Part 3: Fine-tuning your LLM using the MLX framework

This post is the third of four parts of: A simple guide to local LLM fine-tuning on a Mac with MLX.


This part of the guide assumes you have training data available to fine-tune with. The data should be in JSONL format. If that’s not the case then check out Part 2: Building your training data for fine-tuning.

Step 1: Clone the mlx-examples Github repo

Machine learning research folks at Apple have created a fantastic new framework called MLX. MLX is an array framework that is built for Apple silicon, allowing it to utilize the unified memory in Macs and thus bringing significant performance improvements.

The mlx-examples Github repo contains a whole range of different examples for using MLX. It’s a great way to learn how to use it.

I’m going to assume you have knowledge of Git and Github here. You can clone the MLX examples repo using:

git clone https://github.com/ml-explore/mlx-examples.git
Clone the ML Expore repo from Github

For this guide we’re going to focus on the LoRA (Low-Rank Adaptation) examples that we’ll use to fine-tune Mistral 7B Instruct and create our fine-tuning adapters.

Step 2: Start the fine-tuning process using your training data

In prior versions of MLX you needed to convert your model to be MLX compatible. That’s no longer the case, you can specify a model from Hugging Face and immediately start your fine-tuning with it.

We can use the train.jsonl and valid.jsonl file from the last step to kick off the training procedure.

The first step is to head to the mlx-examples/lora folder and install the requirements for the lora conversation script:

cd mlx-examples/lora
pip install -r requirements.txt
Move to the lora folder and install requirements.

Once requirements are installed, we can use the lora.py script to initiate training.

There are a few parameters to know about. You can run the script with the --help parameter to learn about them more, or check out the documentation on Github.

This is the exact command I used to train and start the fine-tuning:

python lora.py \
  --train \
  --model mistralai/Mistral-7B-Instruct-v0.2 \
  --data ~/Developer/AI/Models/fine-tuning/data \
  --batch-size 2 \
  --lora-layers 8 \
  --iters 1000
The command to initiate the fine-tuning process.

The --model argument should point to the path of the model on Hugging Face. If you have a local model then you can provide the model directory of a local MLX converted model. For more info on the conversion process, check out the conversion docs.

The --data argument is optional and should point to a folder that contains your train.jsonl and valid.jsonl files, by default it will look in the current directory.

You’ll want to experiment with the batch-size and lora-layers arguments. Generally speaking the larger your system memory, the higher these numbers can go. The documentation has some good tips for this.

The --iters parameter here isn’t strictly necessary, 1000 iterations is the default. I’m including it because it’s still something you might want to experiment with.

Step 4: Sit back and hear your fans for the first time

Once you’ve kicked off the training process it’ll give you useful feedback on your training, validation loss, tokens, and iterations per second.

With my M1 Max and 32GB of system memory, batch size 1 and LoRA layers 4 I could get roughly 260 tokens/sec on average. With the settings above, I ended up with closer to 120 tokens/sec on average:

Loading pretrained model
Total parameters 7242.584M
Trainable parameters 0.852M
Loading datasets
Training
Iter 1: Val loss 0.868, Val took 94.857s
Iter 10: Train loss 0.793, It/sec 0.223, Tokens/sec 229.758
Iter 20: Train loss 0.683, It/sec 0.293, Tokens/sec 218.803
Iter 30: Train loss 0.768, It/sec 0.072, Tokens/sec 94.586
Iter 40: Train loss 0.686, It/sec 0.081, Tokens/sec 78.442
Iter 50: Train loss 0.734, It/sec 0.230, Tokens/sec 191.031
Iter 60: Train loss 0.600, It/sec 0.043, Tokens/sec 85.585
Iter 70: Train loss 0.691, It/sec 0.027, Tokens/sec 33.718
Iter 80: Train loss 0.568, It/sec 0.031, Tokens/sec 46.508

[...]
Model training output over time.

I’ve also tried training on a M1 MacBook Air with 16GB system memory. It’s obviously slower, but with lower values for batch-size and lora-layers and nothing else running, you should be ok. You can also try using 4-bit quantization to reduce memory needs.

Newer systems with more memory are going to go faster based on benchmarks.

Step 5: Locate your adapters.npz

Once the fine-tuning is completed you’ll find an adapters.npz file in the folder you kicked off the training from. This file contains the additional weight changes to the base model from your fine-tuning and you’ll supply the location of this file in the final step: Testing and interacting with your fine-tuned LLM.


If you have any feedback, questions, or suggestions for this part of the guide please drop them on the Twitter/X thread, or on the Mastodon thread.


Part 2: Building your training data for fine-tuning

Part 4: Testing and interacting with your fine-tuned LLM

Updates:

in Code

Part 2: Building your training data for fine-tuning

This post is the second of four parts of: A simple guide to local LLM fine-tuning on a Mac with MLX.


This part of the guide assumes you have your environment with Python and Pip all set up correctly. If that’s not the case then start with the first step. If you already have fine-tuning training data in JSONL format, you can skip to the fine-tuning step.

There are a number of different tools to get LLMs running locally on a Mac. One good one is LM Studio, providing a nice UI to run and chat to offline LLMs. For this guide I’m going to use Ollama as it provides a local API that we’ll use for building fine-tuning training data.

Step 1: Download Ollama and pull a model

Go ahead and download and install Ollama. For this guide I’m going to use the Mistral 7B Instruct v0.2 model from Mistral.ai. You’re welcome to pull a different model if you prefer, just switch everything from now on for your own model.

To pull the model use the following command:

ollama pull mistral
Pull down Mistral 7B and use the default instruct model.

Once you have the model, you can optionally use the run command in place of pull to try interacting with it from the command line.

Step 2: Determine the correct training data format

In order to fine-tune Mistral 7B we’ll need training data. The training data will allow the fine-tuned model to produce higher quality results that prompting will alone. Your training data should be full of examples of the kind of results you’d want to see once fine-tuned.

Training data for Mistral 7B should be in JSONL format, with each line formatted as follows:

{"text":"<s>[INST] Instruction[/INST] Model answer</s>[INST] Follow-up instruction[/INST]"}
A single line of training data in JSONL format.

If you’re training a different model, the format may look different — so be sure to check.

If you have existing training data in a spreadsheet, database, or some other store your goal is to get it into the above JSONL format. If you’ve done that you can move on the fine-tuning step.

Step 3: Create a prompt for generating instructions

I didn’t have any good training data on hand, so I decided to generate it. I wanted to fine-tune the model to produce more extensive answers to questions about working with WordPress websites.

I used Ollama and ran a range of different models and used the following prompt:

Please list in JSON format 50 frequently asked questions about WordPress from all levels of users working on WordPress websites.

The questions should start with any of the following: “Where do I", "Is it okay to", "Can you help me", "I need to", "Is there a", "Do you know", "Where is the", "Can you tell me", "Can I change", "What are the", "How do I", "When is it", "Does WordPress have", "How to", "What is the difference", "Can users", "Can I", "What is”.

You do not need to provide an answer or category to each question. The list should be a single dimension array of only questions.
The prompt used with various different models.

It took some trial and error to get to that prompt. Asking for instructions to start with a specific phrase helped improve the range of questions generated.

It’s a good idea to spend time here figuring out the best prompt that’ll produce the best list of instructions for your needs.

Step 4: Generate the instructions with Ollama

Once you have a good prompt for generation you can run this through Ollama and switch up the models you use. For each set of instructions I added them to a single JSON file.

Here’s what a truncated result looked like for Mistral 7B:

 ollama run mistral
>>> Please list in JSON format 50 frequently asked questions about WordPress from all levels of users working on WordPress websites.
...
... The questions should start with any of the following: “Where do I", "Is it okay to", "Can you help me", "I need to", "Is there a",
... "Do you know", "Where is the", "Can you tell me", "Can I change", "What are the", "How do I", "When is it", "Does WordPress have",
... "How to", "What is the difference", "Can users", "Can I", "What is”.
...
... You do not need to provide an answer or category to each question. The list should be a single dimension array of only questions.
 [
"Where do I find the WordPress login url?",
"Is it okay to install WordPress on a local server?",
"Can you help me recover a lost WordPress password?",
"I need to update my WordPress version, how do I do that safely?",
"Is there a limit to the number of plugins I can install?",
"Do you know how to create custom post types in WordPress?",
"Where is the database location for a WordPress site?",
"Can you tell me how to add custom CSS to my WordPress site?",
"Can I change the permalink structure in WordPress?"

[...]
The output from Mistral 7B when prompted.

It’s generally accepted that you need at least 50-100 examples to get any favourable results from fine-tuning. I can’t speak to what the ideal amount is, but I suspect you will want more than that. It’s something I still need to experiment with.

I went ahead and generated 1,200 instructions. Next time around I will write a script that does this instead of manually adding them to a JSON file.

Once you have all of your questions in a single JSON file. Save this file. I called it instructions.json.

Step 5: Generate model answers to your instructions

Now you have a JSON file of all the instructions, you can use the Ollama API to generate model answers to each one of them.

To do this I wrote a very simple PHP script that I can run on the command line to query the Ollama API and generate the JSONL training file.

Save this as generate.php in a folder next to your instructions.json file. I have a full example copy on Github where you’ll also find a Python version of the script.

PHP
<?php
if ( ! file_exists( 'instructions.json' ) ) {
	die( 'Please provide an instructions.json file to get started.' );
}

function query_ollama( $prompt, $model = 'mistral', $context = '' ) {
	$ch = curl_init( 'http://localhost:11434/api/generate' );

	curl_setopt( $ch, CURLOPT_POSTFIELDS, json_encode([
		"model" => $model,
		"stream" => false,
		"prompt" => $context . $prompt
	] ) );
	curl_setopt( $ch, CURLOPT_RETURNTRANSFER, true );

	$response = curl_exec( $ch );

	if ( $response === false ) {
		die( 'API call failed: ' . curl_error($ch) );
	}

	$answer = json_decode( $response )->response;

	curl_close( $ch );

	return trim( $answer );
}

function create_valid_file() {
	if ( ! file_exists( 'train.jsonl' ) ) {
		die( 'No train.jsonl file found!' );
	}

	// Remove 20% of the training data and put it into a validation file
	$train = file_get_contents( 'train.jsonl' );
	$trainLines = explode( "\n", $train );
	$totalLines = count( $trainLines );
	$twentyPercent = round( $totalLines * 0.2 );

	$valLines = array_slice( $trainLines, 0, $twentyPercent );
	$trainLines = array_slice( $trainLines, $twentyPercent );

	$train = implode( "\n", $trainLines) ;
	$val = implode( "\n", $valLines );

	file_put_contents( 'train.jsonl', $train);
	file_put_contents( 'valid.jsonl', $val);
}

$json = file_get_contents( 'instructions.json' );
$instructions = json_decode( $json, JSON_UNESCAPED_UNICODE|JSON_UNESCAPED_SLASHES );
$total = count( $instructions );

echo "------------------------------\n";
foreach ( $instructions as $i => $instruction ) {
	echo "(" . $i + 1 . "/" . $total . ") " . $instruction . "\n";
	echo "------------------------------\n";

	$answer = query_ollama( $instruction );
	echo $answer; // for terminal output

	$result = [ 'text' => '<s>[INST] ' . $instruction . '[/INST] ' . $answer . '</s>' ];

	$output = json_encode( $result ) . "\n";
	$output = str_replace( '[\/INST]', "[/INST]", $output );
	$output = str_replace( '<\/s>', "</s>", $output );

	echo "\n\n------------------------------\n";

	file_put_contents( 'train.jsonl', $output, FILE_APPEND );
}

create_valid_file();

echo "Done! Training and validation JSONL files created.\n"
https://github.com/apeatling/beginners-guide-to-mlx-finetuning

The script will allow you to change the model depending on which model you want to use to fetch answers. You can even switch up the model and generate answers from different models.

One thing to note for awareness — the Llama 2 license does restrict using responses to train other non-llama 2 based models. #

To run the script you can call php generate.php and the script will run, showing you progress along the way:

 php generate.php
------------------------------
(1/10) What is the purpose of custom post type syndication in WordPress?
------------------------------
Custom Post Type (CPT) syndication in WordPress refers to the process of sharing custom post types across different websites or platforms. Custom post types are a way to create new content types that go beyond the standard post and page structures provided by WordPress. This can include things like portfolio items, events, jobs listings, or any other type of content that doesn't fit neatly into the default post or page structure.

[...]
Output from the answer generation script showing progress.

Once the generation is complete you should have two new files: train.jsonl and valid.jsonl. We’re going to use these with Apple’s MLX framework to kick off local model training on your Mac in part three.


If you have any feedback, questions, or suggestions for this part of the guide please drop them on the Twitter/X thread, or on the Mastodon thread.


Part 1: Setting up your environment

Part 3: Fine-tuning your LLM using the MLX framework

Updates:

  • Jan 25, 2024: Added a link to the new python version of the generate script. Thank you Arun Sathiya!
in Code

Part 1: Setting up your environment

This post is the first of five parts of: A simple guide to local LLM fine-tuning on a Mac with MLX.


If you’re starting on this journey from scratch, you’ll need to set a few things up on your Mac in order to get going. If you have Python and Pip ready to go, you can skip to step two.

Step 1: Install Homebrew

Homebrew is a package manager that will help you manage and install software that you need (like Python). I like it because it provides an easy way to switch versions and uninstall packages.

To install Homebrew, open the Terminal app (or install iTerm) and paste the following:

/bin/bash -c "$(curl -fsSL https://raw.githubusercontent.com/Homebrew/install/HEAD/install.sh)"
Bash command to install Homebrew

Go ahead and install Xcode command line tools if it prompts you during the installation.

Step 2: Install an upgraded version of Python and Pip

Mac OS has come pre-installed with Python 3 since Mac OS 12 Sonoma. I’ve upgraded to 3.11.x in order to get the latest fixes and security updates.

I would stick to the latest version minus one major version otherwise you may run into issues with libraries that are incompatible. So if 3.12 is the latest, pick the latest from the 3.11 versions.

To install the latest minor release of Python 3.11 use the following command:

brew install python@3.11
Command to install Python 3.11 using Homebrew

Once that has completed you’ll have python 3.11.x and its package manager pip installed.

One optional step is to alias the python3.11 and pip3.11 commands to python and pip, simply to make life a bit simpler when following examples. You’d need to change these aliases when versions change.

You can alias them using the following command (if you installed a newer version, use the newer version number):

echo '
alias python=python3.11
alias pip=pip3.11
' >> ~/.zshrc
Command to add python and pip aliases to your zsh config

That’s it for the environment, you’re now ready to dive in to Part 2: Building your training data for fine-tuning.


If you have any feedback, questions, or suggestions for this part of the guide please drop them on the Twitter/X thread, or on the Mastodon thread.


Overview

Part 2: Building your training data for fine-tuning

in Code

A simple guide to local LLM fine-tuning on a Mac with MLX

Hello there! Are you looking to fine-tune a large language model (LLM) on your Apple silicon Mac? If so, you’re in the right place.

Let’s walk through the process of fine-tuning step-by-step. It won’t cost you a penny because we’re going to do it all on your own hardware using Apple’s MLX framework.

Once we’re done you’ll have a fully fine-tuned LLM you can prompt, all from the comfort of your own device.

I’ve broken this guide down into multiple sections. Each part is self contained, so feel free to skip to the part that’s most relevant to you:

  1. Setting up your environment.
  2. Building your training data for fine-tuning.
  3. Fine-tuning your LLM using the MLX framework.
  4. Testing and interacting with your fine-tuned LLM.

Let me add a disclaimer here. Everything in this space moves really fast, so within weeks some of this is going to be out of date! I’m also learning this myself, so I expect to read this back in a few months and feel slightly embarrassed.

That said, what I’m writing looks to be a good approach as of January 2024. I’ll try and update parts when major changes happen or I figure out a better way.

I hope you find this guide helpful! If you have any feedback, questions, or suggestions please drop them on the Twitter/X thread, or on the Mastodon thread.


Part 1: Setting up your environment


P.S. Happy birthday Matt! Thanks for the prompt to write a blog post.

in Design & Product

Ideas for Zealty

My wife and I are starting to look at houses for sale in our area. There is a wonderful site called Zealty that shares an incredible amount of data, including sales prices, history, and assessed values. It’s invaluable for making an informed decision around what is typically the biggest purchase of your life.

We’ve been using the site for some time, and more regularly in recent weeks. During this time I’ve been able to gather some feedback and suggestions on what could make the experience even smoother. Here they are:

1. Allowing list search parameters to stick when refreshing the page.

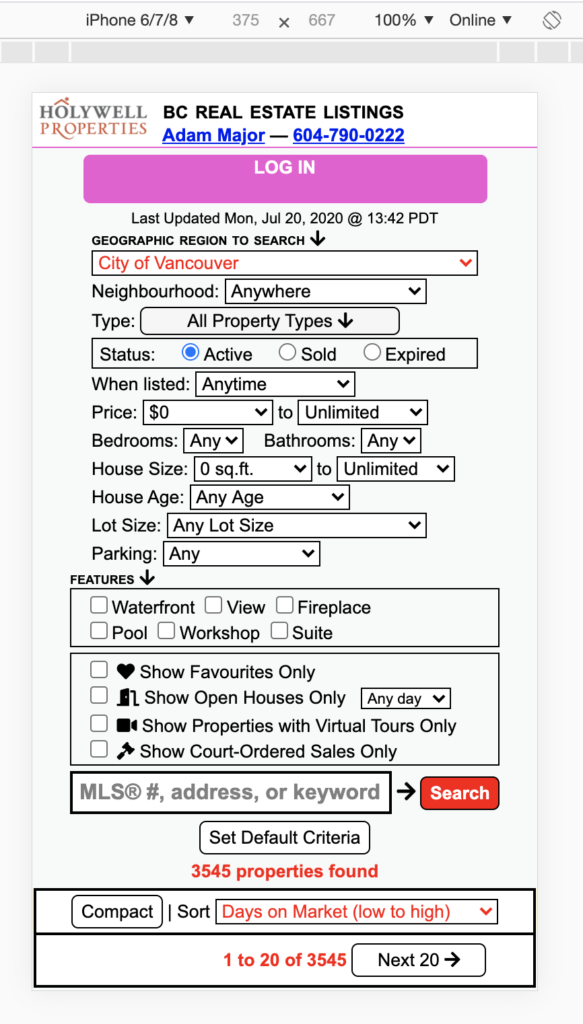
On a mobile screen the search UI takes up the entire height.

Using the list search, if I refresh the page the search parameters are reset. This makes it difficult to come back and check for new listings during the day. I have to re-enter each time which can be frustrating. I also can’t bookmark/favourite a search because the URL doesn’t contain the parameters. Allowing this would allow me to save multiple different searches as bookmarks and load with a single click. Adding these two things would make list searching significantly smoother.

2. Collapse the search pane on smaller screens.

When browsing on my phone the search UI takes up a lot of space. It would be ideal to hide this by default, and have a button to expand and show it if I wanted to modify my search parameters.

3. Add a “Stream View” that shows properties listed on each day with a running total.

Our main use case for Zealty is to look at new properties that have come in each day. The site sends emails at the end of each day, but being able to check for new properties during the day would be ideal. Having an option in this view to break properties out by day listed, and a count total would help with this. So there could be day headings something like “Thursday, July 23 (10)”, and the ten properties listed that day underneath. You would see previous days and totals as you scroll.

We commonly want to quickly refer back to a property that came up very recently (in the last few days). This is not super easy without favouriting properties, and we don’t want to flood our favourites. Having a stream view would allow us to quickly refer back to previous days and find that property.

4. Make list view properties more scannable across device sizes.

I really love the list view because it offers a lot of control. However, across devices the sheer amount of information on each property makes it harder to scan across properties to find something that catches your eye. I spent a bit of time mocking up what a simplified property card might look like across device sizes, and how it would make scanning properties easier. If you want to know more about a property you can click through and get the full detail page:

Scanning properties is easier with more compact cards, and they work well across all device sizes. (Click for large version)

5. Avoid opening new tabs on mobile devices.

When you select a property on the list or map view a new tab is opened. This can make it more cumbersome to go back to the map/list view when you’re clicking through a bunch of properties. If it stayed in the same window then you can swipe back to the previous view and continue. I realize for the list view it would need to handle point number 1 above to work like this. The map view works well already, taking you back to where you left off. Nice!

That’s all for now, as we use the site more I might have some more feedback. Thanks for the great site!

in Product

ProductCraft 2019

This past week I attended the ProductCraft conference in San Francisco. It took place at the Palace of Fine Arts, an incredibly unique venue built in 1915 and features Roman and Ancient Greek style architecture.

The event included a respectable lineup of speakers, including a keynote from Guy Raz, presenter of two of my favorite NPR podcasts: How I Built This, and TED Radio Hour.

Here are the highlights from my notes:

From Guy Raz on seven common pieces of advice he has heard from founders interviewed over the years:

  1. Be prepared to leave your safety net, but do it safely (deliberate preparation is key).
  2. Listen to your doubters (with respect), but do not lose the bigger picture.
  3. Offer something that is clearly better than anything on the market.
  4. Failure is your friend! Learn from it.
  5. Always be ready to pivot.
  6. If you’re comfortable in whatever you do, you’re vulnerable.
  7. Act with kindness, it will pay you back 10x.

Hearing Guy speak in person, it was clear he took considerable energy from stories and ideas imparted by each of the entrepreneurs he’d interviewed. I really enjoy his style of speaking, one of the reasons I’m a fan of his podcasts.

From Jen Dante, head of product for payroll at Square on product ideas and mental models:

  • “Product ideas are only right about 35% of the time.” This was from her time at Netflix and tallying the results of tests over previous years.
  • “Be a fox.” That is, have many different mental models to choose from when coming up with product ideas.
  • Two mental models worth highlighting:
    • The User is Drunk: always consider the unhappy path, be clear when there’s a problem, and how to fix it. Tell them when the problem is fixed.
    • The Kennedy Principle: Don’t ask the user to do things you can do for them. The user only has so much energy, don’t waste it.

There was a lot to take away from Jen’s talk. Be nimble (and humble), even the best ideas and possible solutions are right only a third of the time. Use mental models, don’t get stuck in a single way of thinking. There are many approaches to a problem that can yield vastly different results. I definitely have some new mental models to research.

From Jeetu Patel, CPO at Box on his top 10 tips for product leaders:

  1. Pick the right problem to solve.
    • Hard problems attract the best people, build painkillers not vitamins.
  2. Think 10x.
    • Switching costs are high, so you’ve got to be 10x better than the current state.
  3. Build experiences people love.
    • Emotion is a powerful lock in, you get word of mouth, and gives you pride and joy to work on.
  4. Obsess about product/market fit.
    • If you took your product away would it degrade your customers life?
  5. Retention drives growth.
    • If you don’t have growth users aren’t feeling your product. Deeply understand why your users come back.
  6. Don’t ignore the marginal user.
    • Get a group of power users loving your product, and grow from there.
  7. Define your organizational unit (PEAPOD)
    • P = Product Management
    • E = Engineering
    • A = Architect
    • P = Program Management
    • O = Online Growth
    • D = Design
  8. Hunger and curiosity trump all else.
    • Success follows more easily when you have people with these traits.
  9. Half-life reduces dramatically in the digital age.
    • Your business model is going to last 7 years in the modern age. It used to be 50+.
  10. Purpose matters.
    • There are a lot of choices for what to work on. Hire people intrinsically motivated by your mission.

Jeetu has written up his tips in a Medium post, so you can dig into the details. I thought he brought a lot of insight that is relevant to new and established companies at any stage of scaling either a product or team.

I’d never heard of PEAPOD cross functional teams, it’s something I want to research more on, especially bringing product and program managers together.

in Product

Why are we working on this?

It’s a simple question. One that speaks to a deeper need to understand why you should care and put effort into solving a problem. Knowing the answer to this question — and believing in it — is one of the keys to higher engagement and greater performance of teams.

I recently experienced the need to clearly communicate the why of a new project we were starting for WordPress.com. Working on our new editing experience had dropped me directly in to a point in our user journey that needed major work. I’d experienced first hand via user interviews, customer feedback, and key product metrics that our users expected more flexibility when editing the layout and design of their website.

The design team that worked with me had shared in that user pain, and had worked through early iterations of an editor experience that we felt confident would begin to address the needs of our users. When it was time to consult and get creative input from our engineering teams, the missing why became clear.

Always be Communicating

When you’re deep in to the product, and directly experiencing a user pain point, it’s easy to forget that new people coming into a project do not share that same understanding. In this instance our engineering teams were finishing work on a different product area and had not been fully brought up to speed before consultation.

As they did not have the full picture for the reasons why we were doing this work, some of the feedback on our design efforts so far was of concern. There were many technical challenges, and was this even something that would make a difference? Questions that a clearly communicated why would be able to circumvent.

As a product person it’s vitally important to communicate what the problem is you are trying to fix, and most importantly why this is a problem for your users. Use both qualitative and quantitative inputs to bring clarity and weight to your message.

This should be communicated early, ideally as the first step. It should be repeated often to connect new and existing teams back to the problem, grounding their daily decisions in user outcomes.

in Design

Biennale Internationale Design

Last week I spent time at the Biennale Internationale Design Expo in St. Etienne, France. This was my first time visiting St. Etienne, and the Biennale. It was an engaging and inspiring event that included both a broad range of exhibits and speakers designed to immerse you in design thinking from all parts of the world.

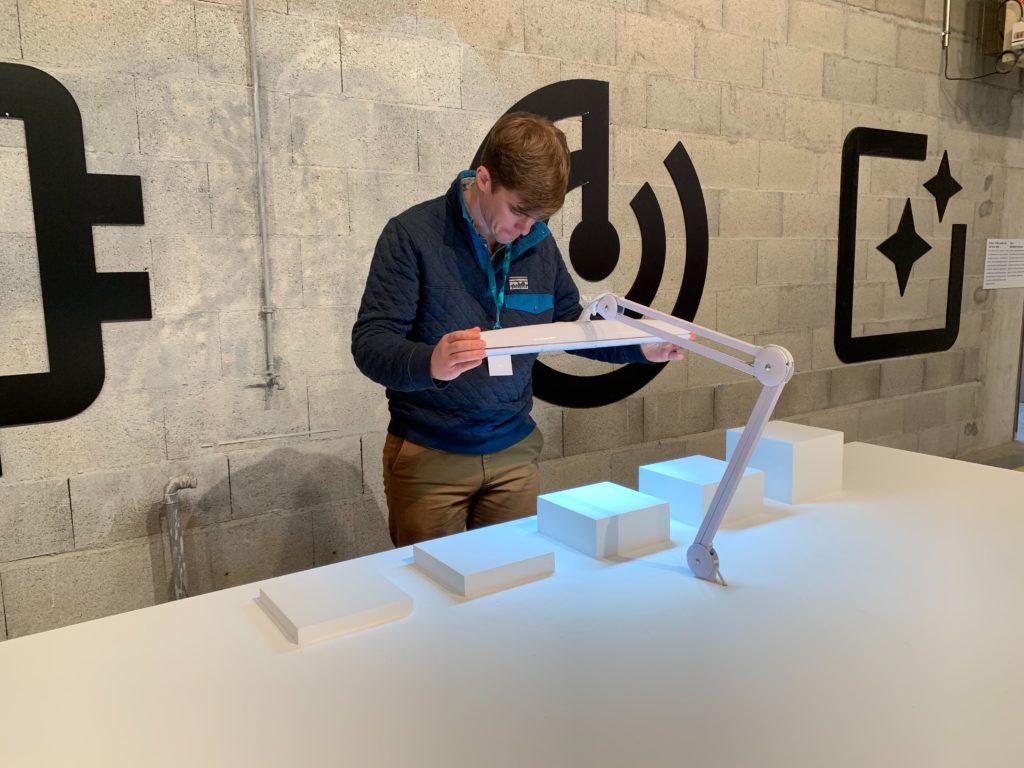
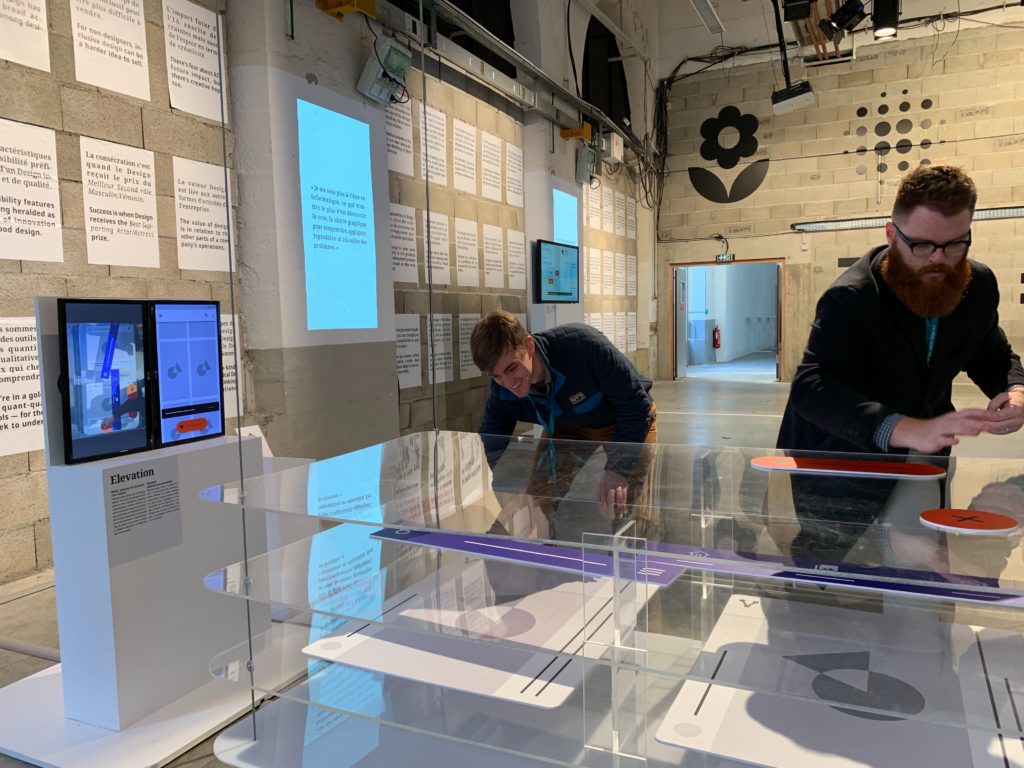
John Maeda, the head of design at Automattic, worked with Google and their Material Design team to produce an exhibit that represented the principles of material design in physical space.

My favourite part of this exhibit was the clever use of light and boxes to showcase how shadows of different diffusion can represent levels of elevation in a two dimensional space.

It was a great event, and a wonderful setting to connect with design friends from Automattic.

in Habits

Today’s Plan of Attack

I’m a strong believer in making lists. It’s something that’s been instilled on me since I was a kid growing up. Both my father and grandfather would regularly remind me of the importance of making a list. I shrugged it off as a kid, but it’s served me well.

I prefer to keep my daily todos on paper, there’s something to be said about writing them out with a pen, and the satisfaction that comes with crossing them out. It’s also distraction free. Each day I start a new list, and I get to reprioritize and determine if something is still important enough to stay on it.

I found this list pad at a local store, I love the tongue in cheek nature of it. Sometimes I wish there was more space, but that’s a whole other problem.